S. Nathaniel Adams

Documenting history as well as my experiences with repairing and restoring vintage guitars.

HEY

Home Top Ad

A Peavy Truss Rod Repair   This Peavy T-40 bass is unplayable because the neck has a crazy forward bow and the truss rod isn't able to c...

A Peavy Truss Rod Repair

 This Peavy T-40 bass is unplayable because the neck has a crazy forward bow and the truss rod isn't able to coax it straight again. To make matters worse, the neck has separated at the glue seam and is distorted to the point that it appears the truss rod is being pulled up through the neck. The adjustment nut is only accessible with a deep socket because the rod has been pulled so far forward.


    Peavy used Fender's design of a micro-tilt neck angle adjustment which pushes against an aluminum disc inlaid in the heel of the neck. I figured that would be perfect for hiding an exploratory hole as I couldn't see anything from the factory square hole. The disc popped out pretty easily and I drilled out until I could see the truss rod before switching to a chisel. Now the issue is apparent.


Peavy built their necks from two pieces of maple glued together and routed one half of the truss rod channel into each board. They would've placed the truss rod into one of the neck halves before gluing them together. This differs from Fender's methods of using a separate piece of maple for the fingerboard or routing a 'skunk stripe' into the back of the neck to facilitate installation. 

    This style of truss rod is a steel rod, laid in a curved channel, anchored at one end and threaded at the other with an adjustment nut that bears against the surrounding wood. As you tighten the nut, it pulls on the rod which forces the wooden neck to bend against the force of the string tension. If the anchor isn't stationary or if the wood behind the adjust nut is too soft, you can't get enough tension on the rod to bow the neck and the truss rod will not work.

    I haven't torn into a functional Peavy neck to see what it's supposed to look like but I'd bet the truss rod anchor is supposed to be about 3/4" away from where it's currently located. They must not have left enough maple in the truss rod recess to support the nut and it began compressing and pulling through the maple.
    
    I've seen a few other Peavy instruments online with splits in the neck which would lead me to believe this isn't a rare issue.

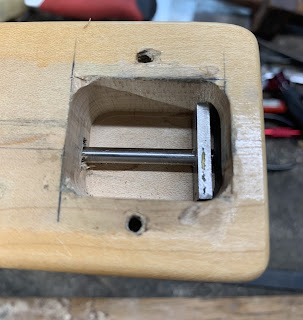
Truss rod anchor (and spoiler of what is to come)

    The truss rod is a 3/16" diameter steel rod with a formed head at the end. I figure they ordered exceptionally long #10-32 bolts. The head or anchor of the truss rod is only 3/8" square and is rounded over from the manufacturing process which doesn't bode well for something you want to remain stationary.

The First Fix

    I loosened the truss rod nut and used a small hammer to tap the truss rod as far back as it would go with the nut still attached. I used a maple dowel and a water-proof sharpie (which is lacquer-based) to mark contact points on the dowel that I would remove with a small round rasp. I repeated this until the dowel touched the bottom of the hole and then I copied that shape into a Bolivian rosewood (pau ferro) dowel. I used a chisel to cut a square recess in the doewl to capture the anchor and then I glued it into place with a 9-1/2" radius block on the fingerboard to force the bulging wood back down.


    After letting the glue dry, I started tightening the truss rod and was able to pull the neck into a back bow but, unfortunately, it pulled the neck apart again and ruined my repair.

The Second Fix

    After that failure, I wanted to start over fresh because it was clear that this anchor wasn't going to stay in place.

    I whipped up a routing template and attached it via the neck mounting screw holes, I routed down until I clipped the truss rod anchor (with a cheap bit). I used a chisel to excavate around the steel rod and remove the remaining pau ferro before switching to a Dremel to lop the truss rod off at the anchor. My cut off wheel was too large so I ran it on the floor of my shop to reduce the diameter. I also kept a small squirt bottle of water to cool the steel.


    With the truss rod no longer captured in place, I tightened the truss rod nut to pull the rod forward until I was able to grab the rod with pliers and pull. It came out fairly easy, there wasn't a lot of glue residue in the channel. 


    With the truss rod removed, I was able to switch to a nicer, bearing router bit and get back down to clean maple. I chose to rout a little deeper into the neck than the original channel so I could press the bulging fingerboard back down. It also helped me remove any of the compressed fibers.


Fabricating a Truss Rod

    Truss rods need to be made from a high-carbon steel and it isn't something that you local hardware store is going to carry, in my experience. We're not building bridges but you don't want the rod to snap or your threads to shear because the only thing worse than replacing a truss rod is having to replace a truss rod a second time.

    In the process of learning this, I did put some junk truss rods into cheap guitars and found out for myself. All-thread is a poor choice because threads weaken a steel rod and an entire rod of threads is about as weak as you can get. They are prone to stretching which would make a truss rod ineffective. Mild steel rods are common in home improvement and hardware stores and are sold as 'weldable steel', 'hot rolled', or 'cold rolled' but are too soft to hold threads for what we are doing. I put a mild steel truss rod in an Egmond plywood acoustic and stripped the threads off before getting anywhere close to straightening the neck, bleh. Don't bother.

    I use O1 tool steel for making truss rods because it's available in a bunch of sizes and is known for keeping strong threads while being workable with hand tools. I've read that machinists also prefer 12L14 for threading because the lead in the alloy makes it a bit softer and easier to work. What you want is commonly sold as 'drill rod' and you want it to be annealed. I called a couple places locally before going online and ordering some 36" long rods.

    For the anchor and nut, I like to follow the precedent set by the big manufacturers because they had it figured out decades ago. The truss rod material should be just as strong as the anchor material (if you are threading) and should be far stronger than the adjustment nut. Gibson uses brass for their adjustment nuts and Fender uses aluminum for their traditional, heel-adjust models. If you are absolutely torquing the nut, you want the threads in the nut to fail before the threads on the rod because one is far easier to replace. 

Threading

    Threading isn't as bad as it seems if you have quality tools. I suffered with a dirt cheap tap and die set before throwing it out and just buying taps and dies as I needed them. It's $10 at my local hardware store for a 10-32 tap and die and I already had a die stock and tap handle to use them.

    I have brass jaws on my bench vise so I popped the drill rod into the vise, horizontally, with about half an inch protruding from the side. Brass won't mar the steel so I can tighten the jaws down. Using a flat file, I flattened the end of the rod and then beveled it at something near a 45 degree angle to help the die start on center. Using one hand to apply pressure onto the rod, I used the other to slowly turn the die until I felt it bite into the rod. I stand to the side of the rod so I can watch my die stock as I turn it and ensure it's, visually, at the same distance from the vise throughout the entire rotation. That helps me determine if I'm cutting straight down the rod or at an angle. A little 3-in-1 oil helps lubricate the cutting action and I back off a quarter turn frequently to break the chips.

    I cut about 1-1/4" worth of threads on the rod, same amount as I found on the original truss rod, before holding it up to the neck of the guitar, marking where I wanted it to end, and cutting to length with a hacksaw. I filed that end square before repeating my beveling step, popping it in the vise, and tapping 3/16" worth of threads on that end. 

    I had a piece of 1/8" thick, annealed O1 tool steel that I bought to make plane blades which will be perfect for my anchor. I spray painted one side of the bar and let it dry in the sun before using a square and a cheap carbide scribe to layout my rectangle anchor. I scribed lines to connect the corners to find the center and hit it with a punch. Before cutting the anchor out of the bar, I checked a tapping chart to determine the right size of drill bit for #10-32. I predrilled with a bit about half the size of what I would finish with and used a rotary burr in my drill to lightly deburr the hole. Then I used a little oil and a tap wrench to cut the threads into my stock. Lastly, using my Dremel, I cut the steel bar to my scribed lines and popped it in the vise to clean up the edge surfaces. 

    The truss rod is not centered inside this neck and actually the two halves of the neck aren't centered either. The anchor is slightly longer on one side than the other but there is plenty of material on the smallest side so I'm not concerned. Turning the neck around, I grabbed two Gibson-style truss rod nuts (same thread) and ran them up the rod before tightening one against the other to create a jam nut. Now I could turn the rod and thread it into the anchor.


Testing

    Before gluing or setting anything permanently, I wanted to confirm that this was a success so I needed to plug the rest of the hole that I routed out earlier. I have some maple, approximately 1" by 2", that I got from the hardware store because it had a little bit of 'birdseye' figuring and it happens to be ridiculously hard. It doesn't dent under my fingernail and on the belt sander, it abrades slowly and the end grain is very quick to scorch. I marked two 1/2" diameter circles on the board and cut my plugs to fit the holes.

    I flipped the neck over and began tightening the truss rod and was thrilled when the neck was able to be pulled into a considerable back bow without any movement of the fretboard crack. 

Assembly

    Disassembling the truss rod was slightly less fun as I had to loosen the adjustment nut, tap the rod backwards, and pull the maple blocks out before using vise grips to unscrew the rod from the anchor and removed both from the neck.

    Nobody wants a truss rod that rattles inside the neck, and since I broke the glue residue in the channel when I pulled the original rod out, I wanted to make sure that I was covered. Silicone is a common choice but it was too viscous to flow down into the channel so I used clear, non-expanding polyurethane glue because it remains flexible after curing and introduces no water into the neck. I coated the truss rod in paste wax before reinstalling it through the headstock to prevent any sticknig.

    As the truss rod end came into view, I cleaned the threads off with a solvent and a shop towel before applying Loctite Threadlocker 271 to the rod and the anchor. The truss rod will snug itself up when you tighten it and can't move any further but I wanted to prevent the rod from backing out as you loosened the truss rod. 271 is considered permanent unless you heat it up to 500 degrees Fahrenheit.

    I coat the maple blocks with Titebond before tightening the truss rod to lock everything in place. A fillet of maple is glued in between the blocks to cover the rod and provide a surface for the aluminum micro-tilt disc to be inlaid back into the neck.


Final Thoughts

The truss rod tightened down

    I believe the failure of this truss rod to be from a manufacturing defect that didn't leave enough maple for the anchor end to rest against and that caused it to pull through the neck. This was worsened by the small size of the anchor and the rounded face which made it easier for the wood to crush and be pushed out of the way. Lastly, the design of the truss rod includes a dip down, past the end of the channel's curve, to fit the anchor and that meant that the anchor was being pulled up towards the fingerboard instead of in line with the neck. 

    My anchor is positioned so that it pulls straight toward the headstock and intentionally made large enough to spread the force against as much maple as possible. 

A crude illustration of the neck's cross section
The original design is on top, my new truss rod is on bottom

 Visually, the repair could've been better if I had jumped straight to cutting the truss rod out rather than trying to glue the crack, testing a truss rod repair, and having the crack reopen along. Light colored woods are super tough, you really only have one attempt to make it invisible without breaking out your artist's palette. If this was a rosewood board, I'd sand it and use CA to bind a patch of rosewood dust to the crack and it'd be an invisible repair.

Did it work?

Yes.... No.

    With the new truss rod, I was able to put the neck into a considerable back-bow without cracking or separating the neck which is a massive improvement from where we started. That was a successful truss rod replacement and should've guaranteed success. Minutes after tuning the bass up to pitch, the neck began pulling forward and ended up exactly where we started, damn... I tightened the truss rod, to no avail, and eventually felt it start crushing the wood fibers at the headstock end - failure. 
    
    Would a heat press save the neck? eh. The speed in which the bass went from an 1/16" of back bow to a 1/16" of forward bow has me suspecting this piece of maple was destined to fire off arrows rather than riffs. 

    An experimental repair would be to rout slots in the back of the neck, not unlike a Fender skunk-stripe, inlay carbon fiber strips, and cap with wood before carving to match the neck profile. That's a couple days worth of work for a $600 bass and no guarantee of success. I'm calling it quits. Hopefully if you find yourself in the same scenario, this might help you work through a truss rod replacement and hopefully you have better luck than I did. Not all pieces of hard maple are created equal.

Related Reading

    I enjoy reading blogs about complicated or unusual guitar repairs and I've referred to these in the past when I've replaced truss rods.

Strange Guitarworks on fixing a Gibson Grabber bass with a broken truss rod and broken scarf joint.

Strange Guitarworks, again, on replacing a Fender Jazz Bass truss rod by removing the skunk stripe.

Jack's Instrument Services replacing a truss rod on a Fender Music Master with a hair-raising move to cut into the fingerboard to reach the anchor.

Haze Guitars on a Gibson ES-335 with a truss rod channel cut too deep into the neck - unfortunately I couldn't find a follow up to this post.

Strange Guitarworks, I like their content, on replacing a truss rod in an Epiphone Rivioli by removing the last couple fret's worth of fingerboard to access the anchor.

     Ebay user  ortizwilli   listed a unique guitar dated to the 1920s that piqued my interest because of it's unusual body shape, size...

    Ebay user ortizwilli listed a unique guitar dated to the 1920s that piqued my interest because of it's unusual body shape, size, and a clear label attributing it's construction. All of these images came from the Ebay listing and while I did not bid on the instrument, I thought it was interesting enough to discuss.

    The instrument has a very narrow, squash-shaped body and fragments of a unique headstock shape with traditional friction pegs.


Peering at the sound hole, we see a fingerboard extension that is styled like the old European guitars of the 1800s and what appears to be bar frets. The soundhole, itself,  is an unusual 'bean' shape with a rosette of a single species of wood inlaid. We can see a paper label with very fine penmanship and two names.


The bridge is also unique but appears to be incomplete as the shading on the top would suggest that this bridge originally had some curly ends. This would make sense from a traditional, 1800s European guitar which had bridges that looked like fancy mustaches. A single ebony bridge pin with pearl dot is all that remains.


A close-up of the label reveals a date of 1923 with a note "To my Friend, Haydon Jones, from A.J. Dettinger".

From here, I began searching Ancestry for matches on the east coast (where the seller is located) and found an Alvin J. Dettinger in New York.

Alvin J. Dettinger

Alvin Dettinger was born on January 26th, 1871 to John G and Barbara Dettinger in St. Johnsville, New York. In 1892, he married Lillian Kretser and they had two children. The earliest reference I can find to his instrument-making was the 1900 census where he was employed as a 'piano action maker' which refers to the mechanism that swings a hammer at the string corresponding to the key that was depressed. This would've been woodworking and mechanical engineering on a small scale as the weight of the keys need to be calibrated consistently and smoothly for the player. By the 1910 census, he was a foreman at a piano manufacturer. Jumping to the 1920 census, he was working as a carpenter for Remington Typewriter Company which may have included pattern making as their typewriters appear to be mostly made of cast iron. And in the 1930 census, he was listed as a pattern maker for a cash register manufacturer. Pattern making is a highly skilled trade as the craftsman is building models to form molds for casting objects out of metal. It requires an understanding of how metal shrinks to adjust the dimensions of the model and also to prevent cracking in the final casting. 

Haydon Jones

Haydon Jones is harder to track down, I did find Mr Robert Earl Haydon Jones who was born in 1871 in Ohio, lived in Manhattan during the 1900 census, lived in Massachusetts during the 1920 census, and lived in Queens during the 1930 census. He was an artist and more specifically a cartoonist for a newspaper. There were seven million people in New York City in 1930 so I cannot definitively say that these men knew each other but it's the only lead I have.


Most noticeably, this guitar has a cylindrical, arched back.


The neck heel is rather beefy but the intersection between the heel and the neck body itself is carved to look like an intersection of two pieces of wood meeting at a right angle. That is how the old guitars of the 1800s were constructed. But we can see from a witness line just below it that this neck has a grafted heel and the mitre carve is only aesthetic.


This is a very unique instrument with a story behind it that has been lost to time.

Ignore the three wooden clamps "Manufactured by The Chicago Music Co Platt P Gibbs. Pres 195 & 197 Wabash Ave. Cor Adams Chicago, I...


Ignore the three wooden clamps
"Manufactured by The Chicago Music Co
Platt P Gibbs. Pres
195 & 197 Wabash Ave. Cor Adams
Chicago, Ill"

This label appears inside a guitar that I was hired to work on, the neck was detached and I was to put the neck back on and adjust the angle so the instrument could play again. I had never heard of this firm before.

About

The Chicago Music Company was headed by Platt P Gibbs serving as the President, Treasurer, Manager, and Director (an extensive list of accolades) with M. E. Gibbs as the Vice-President and Director and Herbert P Gibbs as the Secretary and Director [1]. The earliest reference to the Chicago Music Co that I could find dates to 1878 advertising tickets to a preacher giving a lecture. Their address was 152 State Street [2].

An 1888 advertisement mentions the sale of Steinway pianos at their location at 148 and 150 Wabash Avenue.

Image Credit: Newspapers.com

An 1896 listing in the Chicago city directory places the company at the corner of Wabash and Adams.
Image Credit: Google Books

The first mention of guitars comes in 1897 where they are offering a closing sale before moving, the address listed does match the above guitar's label.

Image Credit: Newspapers.com

Another advertisement from that same year 
Image Credit: Newspapers.com

Jumping forward a couple years, in 1902 an advertisement for discount musical instruments indicates that the Chicago Music Co had gone bankrupt and their assets sold to wholesalers at half price.

Image Credit: Newspapers.com


However, a 1906 report by the Illinois. Office of Inspector of Factories and Workshops indicates that they are still operating at 251 Wabash Avenue and are a music store. 


Guitars

I worked on one of these guitars and it had the tiniest neck joint I had ever seen. Unsurprisingly, the guitar came to me with the neck detached. 


Sources

[1] https://www.google.com/books/edition/_/NWvZAAAAMAAJ?hl=en&gbpv=1&pg=PA89&dq=%22chicago+music+co%22
[2] https://www.newspapers.com/image/32582508/?match=1&terms=%22chicago%20music%20co%22%20%22platt%22
[3] https://www.newspapers.com/image/668140109/?match=1&terms=%22chicago%20music%20co%22%20%22platt%22

  Image Credit:  Ebay - Ruby and Rad Vintage I saw this incredible photograph on Ebay of a luthier in his workshop with one completed instru...

 
Image Credit: Ebay - Ruby and Rad Vintage

I saw this incredible photograph on Ebay of a luthier in his workshop with one completed instrument, numerous in-progress instruments, and a small collection of tools. I did not win the auction but I decided to embark on researching the origins of this photograph to give this man his identity back.

The Photo

I thoroughly enjoy old photos of craftsmen at their benches, I find a lot of inspiration for my own workbench layout as well as excuses to buy old tools just because I see them in these photos. I do wonder about what his day was like and whether he ever had an apprentice or a helper or he alone was responsible for building.


The first thing that caught my eye was the Windsor-style chair on the right side of the photo. Its relevant to absolutely nothing but I grew up with modern reproductions of this chair at our dinner table so it stands out as being something I can immediately identify with. We can see two boards, about as long as his bench is tall, leaned up against the wall and with fairly non-descript grain. I would wager that these are neck blanks or perhaps spruce for braces and three or four piece tops (which were more acceptable back then). I find it interesting that he attached boards to block off that end of the workbench.


On top of his bench, I don't see a 'tool well' that you might find with classical workbenches rather it appears to be simply a flat board. To his right we can see two necks in progress and the headstock of a third neck or perhaps a template leaning against the wall. He appears to be working in front of a mirror which I imagine has helpful properties in ensuring his work is illuminated from all angles. To his right is a shelf with foliage printed wallpaper or fabric hanging off and a box and glass bottle on top. I would guess that might be his alcohol or oil for french polishing.


The bench, itself, is interesting to me not only because the apron appears to be a single board, at least 15-18" wide, with continuous grain and visible sap wood at the top. You don't find trees like that anymore. He's gone ahead and built himself a large drawer (what I wouldn't give to see what's inside there...) with cast metal pulls. He includes a cut out in the apron to access a shelf filled with indiscernible objects and we can see his repurposed crates for storage. The bottom left looks like it says "Lump Starch" but I have no clue what that might mean. I can see a shape in that box which looks like a cut-off or a mold for a guitar body.

His leg-vise has a metal leadscrew as a nice improvement over the traditional solid wooden screws which would've been in use by generations before him. The board at the bottom with the staggered holes and peg prevents racking of the vise as you tighten it down on an object. 


Next to the craftsman's hand is another neck in a unique vise that I'm not familiar with. It also gives us our best look at his signature headstock shape, this would be the key to identifying any of his instruments. Back to the vise.. Its small, like a jeweler's vise, but the ones I'm familiar with usually have an integral clamp so you can attach it quickly to your work surface. This might be mounted underneath with a screw and nut or partially inlaid into the top. 


Here is where one can get real nerdy, real quick. Starting from the bottom, I now see that he is holding a rasp or file for the photograph. To the left of the neck is a hand plane laying on it's side and it appears to be a 'transitional' plane with a square wooden body and cast iron hardware for adjusting the blade. Handing on the wall is his bit brace for boring holes in the instruments. We also get a good view of one of his finished instruments with a pyramid bridge of ebony or rosewood, a distinctive cut-out at the end of his fingerboard, and fairly plain appointments on the top with a rosette and purfling.

Jumping up to the shelf and starting from the left, we can see three screw drivers leaning up against a tower of three boxes. Who know what treasures are in there. His draw knife is easily accessible hanging off the shelf and I believe I see a decorative molding cut into the bottom of the shelf. Above the draw knife is a metal block plane like you'd find today at the hardware store, the design hasn't changed a whole lot in a hundred years. I wonder if he bought a Union or a Stanley. To the right of that plane we see two more planes which are of an older, more traditional style. He has a 'coffin' plane sitting on top of another plane that looks to be two to two and a half times as long which should make that a 'jack' plane. The wooden style is adjusted with a mallet rather than the slick adjusters found on the plane sitting on his bench or the block plane on its side. Perhaps that's why these are sitting behind a row of six smaller objects and two circular objects. I suspect the small pieces to be violin-makers planes which are tiny planes held between your fingers for delicate work and graduating the top and back of a violin. I have no clue what the circles are.


On the wall we have a nice assortment of finished guitar boddies waiting for the craftsman to carve the necks. I counted three, maybe four, necks and six bodies waiting for assembly. That would explain why he still has a neck mounted in a vise. The bodies near the top have decorative strips running down the center of the back and end grafts on the sides while the bodies below appear more plain. It's quite difficult to discern any wood detail from a photo of this age but I would guess that these are mahogany, maple, or some other light-colored wood. They certainly aren't rosewood. We also see on the far right, behind his head, the handle of another saw. I would be this is his folded-back saw that he would use for precise cutting of his dovetails and fret slots.


Lastly we see the roughing tools for his stock prep. A large saw for ripping boards and a hatchet for hewing or splitting his spruce brace stock.

The Search

The back of the photograph has an ink stamp advertising "The Bowen Art Studio" at "46-1/2 North Meridian Street" in Anderson, Indiana. I wasn't familiar with Anderson but found that it lies between Indianapolis and Muncie, closer to Muncie, and is the seat of Madison County. As I was searching through old maps, it seems like a typical, small industrial city with a lot of people employed as general laborers. The population doubled from 10,000 in 1890 to 20,000 in 1900 so there was no shortage of new people looking to make their start.

This style of photograph which is affixed to a cardstock backer seems to be most popular in the late 1800s, I believe its called a cabinet card, and remained popular up until the introduction of personal cameras in the teens. As I've found in my previous research, the late 1880s saw a boom in small, local shops building guitars and mandolins for the newly emerging middle class. This lasted until the First World War when labor became difficult to come by and tuners and purfling from Europe became inaccessible. 

I located the photo studio in an 1890 Sanborn map of the city and found it was above a barber shop near the center of town. I scoured the map hoping for a building labelled as a manufacturer of musical instruments, I haven't seen it yet on one a small operation but I can dream. I found nothing.

Image Credit: Library of Congress - Sanborn Map c.1890

Anderson was not as easy to find specific information about as many of the other towns I've come across. Documents from these periods do exist but they are not as accessible online as I'm used to and without owning one of these guitars, I'm not quite ready to drive four and a half hours.

A Lead

After coming up blank on Ancestry and FamilySearch, I ended up getting a trial to MyHeritage which is another ancestry-mapping website with a slightly different set of historical documents. None of these websites expect you to be searching for anything other than names of people in certain places at certain times, they're geared towards you having an idea of who you are looking for. It becomes more difficult when you are searching by occupation or street address especially since they don't usually want you combing through the pages of their scanned books, they'd rather send you directly to a record for a person. Ancestry is the easiest to navigate, MyHeritage was a little trickier.

In the 1891 Anderson City Directory (the only one they had), I found a single person listed as a musical instrument manufacturer. S. C. Cochran who had set up shop on 111 1-/2 North Main Street! As we found with the photo studio, this would probably be on the second floor.

Image Credit: MyHeritage

And on the same 1890 Sanborn map, I found the address which places his shop above a plumber's


It was rather difficult to find any matching individuals on any of the research websites, the closest lead I found was for a Simon or Simeon Cochran who was a carpenter in the 1900 census. 

This late 1972 Guild twelve string came to me in need of some repairs. My initial inspection of the guitar showed that the bridge was well s...

This late 1972 Guild twelve string came to me in need of some repairs. My initial inspection of the guitar showed that the bridge was well seated around its perimeter but the 'belly' of the bridge was separated about 1/16" from the top and that void was filled with wood glue. I wouldn't let that ride on a six string and it is definitely not good with the extra tension of this guitar. That will never do.

I used my vinyl sealing iron to warm the bridge and applied De Glue Goo, a gel vinegar solution, to the glue to assist in breaking the bond. The process took about thirty minutes from start to finish. Once the bridge was removed, I realized that this wasn't simply a lifting bridge but rather a full bridge reglue that went awry. I wasn't the first person in here.


We are looking at pieces of top wood missing and pockets of glue in their place. Neither of which are signs of a good reglue. Wood glue is a poor gap filler as its meant to bond two, well-fit, surfaces together. Further, wood glue bonds poorly to itself so applying more glue on top of the already dried glue is a waste of time. This needs to be fully redone if the I want this guitar to have any change of survival. 

Surface Prep


With two, freshly-sharpened chisels I began carefully carving away the glue and excessively damaged spruce. I make up a couple of small sanding blocks using scraps of wood with bevelled edges and 120 grit sandpaper glued to their face. These blocks are used to level the surface and prepare the spruce for the patches that I will be gluing in. I've also found it helpful to apply low-tack masking tape to the top, trace the bridge outline, lightly score the tape, and use that to clearly define where I need to stop.


I have removed about 1/32" of wood, about the most I'm comfortable with, which has exposed fresh, clean wood.Notice how towards the perimeter of the bridge I have removed less spruce than the center, that is crucial to the success of this repair.

The strength in this joint is the bond between the long side of the patch (shown in yellow) and the long side of the recess in the top. In a quarter-sawn board, like the spruce top and patch, these sides are known as the 'face' grain. Wood glue excels at bonding timber on the face or side grain but is weak bonding 'end' grain. We have to consider this when inlaying the patch.
In red, you see an example of weak glue joint where the end grain of the top is glued to the end grain of the patch and both boards meet at a right angle. I'm not going to claim any formal knowledge of engineering, but my understanding is that right angles 'concentrate' stress and will break first. My own experiences in woodworking and repair support that understanding. A repair using this technique will certainly fail.

In green, you see an example of a strong glue joint where the clear line between end grain and face grain is fuzzy, there is a mixture of both. In addition, the taper allows both materials to flex as the patch is less rigid where it is thinner. This spreads the stresses out across both pieces.

Making the Patch

Quartersawn spruce stock is an odd thing for a hobbyist to find but I've found that its easiest to find a wood or lutherie supplier and buy a B stock top, an orphaned top, or a spruce bridge plate. It pays off for making cleats and patches. I suppose one could find quartersawn spruce veneer but I haven't found it necessary. Using the right species and cut of wood makes the repair look professional and spruce has one of the highest weight to strength ratios of timber. It makes sense to keep it consistent.

First, I use a thickness (or drum) sander to reduce the spruce to about 1/32". Usually these patches will sit proud and have to be pared down. Then I mark my desired area on the bridge, align the spruce on the bridge, and trace the perimeter. I use a bandsaw and spindle sander to shape the patch. Lastly, I sand a matching bevel into the bottom of the patch and then, on the top, sand a wider bevel to allow the patch to flex while I clamp it.

I press the patch into the top to check its fit and confirm that it contacts the new top fully, sanding any material that prevents a perfect fit. When I am ready, I apply water to the top of the patch (to prevent cupping) and apply Titebond I, the red bottle, to my prepared surface. I press the patch into the glue and lightly work it back and forth to ensure the glue makes full contact.

The patch sits in its channel and resists being moved around, this is exactly the fit I was looking for.

I made up a couple cauls out of some scrap maple and tapered them along their length so they have a little flexibility. My patches don't sit perfectly flush with the top, at this stage, so the flexibility is beneficial. I use a plastic straw with the end cut at an angle to scoop up the excess glue and I usually apply masking tape to the bottom of my cauls to prevent them from being glued to the instrument.

Finishing

After the patches have had a chance to dry, I come back in with chisels and working in a slide-to-slide, slicing motion to carefully trim the spruce back. This would be considerably easier with a cranked-neck chisel but I don't own one yet. The sanding blocks come back, again, to level the surface. Masking tape is very important to prevent damaging the lacquer.

As I work, the edges of the patch become translucent and you can see the original wood underneath. I'm not trying to glue the bridge onto a platform but, rather, bring the low spots up to meet the original wood. Near the top of the photo you can see one of my patches doesn't extend the full length since the original wood was in good condition there.

I check my work using a ruler and find that the surface is consistent, level, and at the perfect depth for the bridge. The patch can't be much thicker, now, than 1/64" but it has a clean bond to the original wood and will cleanly bond to the bridge.


  About      Gustav Adolph Carlson was born in April of 1869 in Sweden. As is often the case, his early life in the old country is unclear. ...


About

    Gustav Adolph Carlson was born in April of 1869 in Sweden. As is often the case, his early life in the old country is unclear. He immigrated to the United States in 1891 and settled in Chicago, a booming city with a considerable Swedish population. In 1895, he married a fellow Swede named Alma Malinquist and by Februrary of the next year they had their first and only child, Pearl Lillian Judith Carlson [1].

1895 Sanborn map showing 6011 S. Halsted
Two families lived at 6011 and a large outbuilding would've been ideal for a workshop.
Image Credit: Library of Congress

    The earliest reference to Gustav is found in the 1896 City Directory where he was working as a guitar maker and living at 6011 South Halsted Street in the Englewood neighborhood [5]. In the absence of surviving literature from the years prior, his formative years in Chicago are unknown. I can reasonably assume, from my research on other luthiers of the period, that he would've had been apprenticed to a carpenter, cabinetmaker, or joiner as a boy and brought those, marketable, skills to the new world. Chicago had one of the largest populations of musical instrument manufacturers in the country, rivalled only by New York, which would've offered a wide selection of large firms and independent builders with whom to learn from.

The Storefront

    By 1897, he was operating out of 741 West 63rd Street, a few blocks south of his house, and listed as working with musical instruments [2]. Interestingly, his building number changes to 750 in 1898 and 753 in 1899 [3][6]. I can't say I entirely understand why it changed each year but perhaps numbering was more a loose suggestion until Chicago standardized and renumbered their streets a decade later. Perhaps Gustav was actually moving his shop and tools to the neighboring building each year but I find that hard to believe. By the 1900 census, his residence was listed as 755 West 63rd Street and he was working as an 'instrument manufacturer' [4]. I do believe he moved into this building as it was three stories, compared to the single level at 741, and would have plenty of room for a family to live above a business. 

1895 Sanborn Map showing the 700 block of W 63rd Street
Image Credit: Library of Congress

    I won't suggest drawing a connection between the address on the label, his address in the directory, and try to conclude the date of manufacture unless a Carlson instrument surfaces with an altered label or different address. I believe the story behind this to be far more simple if we place ourselves in his shoes. Gustav, having just signed the lease on a storefront, would've sought out a printing shop in the directory and placed an order for a stack of paper labels with his name, occupation, and address. As an investment, tossing the inaccurate labels would've been foolish and a customer walking down the 700 block of 63rd Street would've found him anyways.

Taking the 9 to 5

The Chicago trail ran cold after the census but surprisingly there was a hit in Denver, Colorado for Gustav and "Emma" in 1910. Gustav was working for the Pullman Company, the railroad giant. It took a while to detangle the mess of information and it turned out that Pearl, their daughter, was the link connecting the families. It's a unique name. They first appear in Denver in the 1903 city directory living at 399 Williams Street and working as a carpenter. By 1905, they are living at 3406 Humboldt Street and by 1910 they are living at 3408 Humboldt [8][9].

Manufacturing instruments is a tough business. Its expensive in materials, tools, and time building for a clientele that often makes their living with gigs. I believe Gustav learned of an employment opportunity, utilizing skills he already had, and simply couldn't refuse an opportunity for a steady paycheck. Or perhaps he was chased out of town for cheating at cards. I'm just speculating.

Gustav worked for the rail company until his retirement and when Alma passed, in 1944, he moved in with Pearl and her husband Albert Sorenson. His date of death is unclear and, through this research, I really understood how even paper records are prone to human error or omission. Alma was thirteen years younger than Gustav and nine years younger than what was originally claimed in the 1900 census. That age difference is supported in each census from 1910 to 1940 but her tombstone references her, likely incorrect, birth date. Their daughter Pearl Lillian Judith and Gustav's birthdate are the only consistent facts.

Instruments

I would safely place the production of G. A. Carlson's instruments, on 63rd Street, between 1896 and 1902.

Gregg Miner's incredible website, www.harpguitars.net, features two articles about Carlson's instruments. His knowledge pertaining to harp guitars and how they evolved makes the articles very well informed. He has a collection of black and white photographs showing harp guitars with the bands and musicians that played them and was able to connect historical photos with photos of Carlson instruments that have surfaced in the modern era. He notes four possible Carlson instruments including two that he knows to have survived. I am in the process of repairing a previously unknown example, the fifth G. A. Carlson harp guitar to be identified on the internet.


Construction of one Carlson harp guitar

Gregg Miner includes images and descriptions of the details and structure of the Carlson guitars that he has seen, including the Carlson that he currently owns. This instrument differs in a few ways from the guitars that Gregg has observed but it still shows enough of the tell-tale signs of Gustav's hand. He didn't build each guitar exactly the same, there was some experimentation and evolution.

This instrument was sitting in a damp environment, the tail end has water damage and the back has fallen off. There are previous repairs and modifications which need to be addressed but the core of the instrument is still there. The top is constructed from four pieces of spruce, I'm no good with identifying specific species, and finished in a french polish. The back and sides are birdseye maple and finished in a varnish, like a violin. It has the most curious bridge, its a large piece of mahogany (likely cuban) with integral through holes which connect to the tailpiece. The bridge is secured to the tailpiece with split nuts.


I was surprised by the bracing inside this guitar, it's the largest bracing I have ever seen in an instrument and I couldn't be happier. Instruments from this era were, primarily, built for gut strings and were braced very lightly. Once steel strings became mainstream, they found their way onto many guitars including those that definitely weren't built for it. This guitar was built stout enough to support the extra tension and I am certain that helped guarantee the survival of this guitar. Each longitudinal brace is 9/16" wide by 3/4" tall with about 1/16" in variance. These braces are rectangular and burnished to a dull sheen. The bridge plate is a 1/4" piece of walnut. The tail block reinforcement has since fallen off and been lost. 

Here is a closeup of the upper bout. The dovetails were cut with a handsaw and don't quite meet the centerline of each neck. The soundhole reinforcement braces are large, which is excellent. And the 'popsicle' brace between the neck block and first brace is a nice addition. Martin wouldn't use it until the late 1940s.

Here is a bug I found in one of the braces, not cool little buddy. You can also see that the back braces are carved very flat and the edges are more crude. This will come up in my restoration blog as I believe the braces to be original but tampered with.


Sources

[1] 1900 Census - https://www.ancestry.com/imageviewer/collections/7602/images/4113743_00583?pId=11420534
[2] 1897 City directory - https://www.ancestry.com/imageviewer/collections/2469/images/4710924?pId=368304793
[3] 1898 City directory - https://www.ancestry.com/imageviewer/collections/2469/images/4734708?pId=372934718
[4] 1900 Census - https://www.ancestry.com/imageviewer/collections/7602/images/4113743_00583?pId=11420534
[5] 1896 City directory - https://www.ancestry.com/imageviewer/collections/2469/images/4703606?pId=372934718
[6] 1899 City directory - https://www.ancestry.com/imageviewer/collections/2469/images/4706343?pId=368304793
[7] 1910 Census - https://www.ancestry.com/imageviewer/collections/7884/images/31111_4328173-00526?pId=130307002
[8] 1910 Denver city directory - https://www.ancestry.com/imageviewer/collections/27620/images/dvm_LocHist011768-00166-0?
[9] 1905 Denver city directory - https://www.ancestry.com/discoveryui-content/view/928121728:2469?tid=&pid=&queryId=5d778592-a70d-4fef-bdff-0c0539fc71b3&_phsrc=EUo129&_phstart=successSource