Documenting history as well as my experiences with repairing and restoring vintage guitars.

Home Top Ad

Introduction I traded some gear and acquired a Custom Kraft amplifier which turns out to be a rebranded version of the Supro Trojan S6622 ...

Vintage "Daisy" Doorstop Footswitches

Introduction

I traded some gear and acquired a Custom Kraft amplifier which turns out to be a rebranded version of the Supro Trojan S6622 made by Valco in Chicago, Illinois. It sounds wonderful with its single 6V6 power tube but that will have to be another blog post. Interestingly enough, heres the schematic for the amp: https://schematicheaven.net/bargainbin/supro_s6622.pdf

Supro amp
Source
Custom Kraft Supro 6622 amp
My amp
My amp has two jacks for instrument pedals; one for the tremolo and one for the spring reverb. But this amp did not have any footswitches when I bought it so there is a need for some control pedals. Enter the Daisy door stop

Daisy Door Stops

The design for the door stop was patented (1,999,111) by William F Schacht from Huntington, Indiana in 1934. He claimed that his design would prevent the door stop from slipping, would reduce unnecessary rubber, and allowing the door stop to be stored upright. All traits that one would expect in a doorstop... Jokes aside, I'm fairly certain that this style has become the standard and so I have to give Mr. Schacht credit for that invention. 

Daisy Doorstop Patent
Technical drawing from the US Patent Office website
Picture of a Daisy doorstop
The legendary door holder itself

They were mass produced by his company, Schacht Rubber Manufacturing Company which was established in 1909 and sold in 1981. 


Amp Footswitch

The footswitch is usually a toggle switch attached to a box which allows you to toggle certain features of your amp, most commonly used with reverb and channels. Supro and likely other manufacturers from the era used whatever was cheapest which happened to be a doorstop.
Source
Source
You can see the actual footswitch itself in the Harmony catalog and then the Supro catalog shows a similar amp model to what I have as well as the cost of the "remote foot switch accessory" for $6.50 each.

Conclusion

So "Daisy" branded amp footswitches are not actually from a guitar company named Daisy (and most certainly not the Daisy Rock First Act guitars) but are actually old doorstops that were fashioned into switches. 

Source

The switches aren't terribly expensive based off what I can see on Reverb though they really don't come up that often either. 

Guitarologist

This guy is a fantastic Youtuber who is very knowledgeable on guitars and their accessories, it was through him that I discovered that these were doorstops and not their own brand which inspired this write up.

Heres a video of his where he talks about building your own from a modern doorstop


No comments:

I might have vented on this in the past but ebonized (wood that has been dyed to look black) woods are an absolute pain to work with so I fi...

The Scourge of Ebonized Fretboards

I might have vented on this in the past but ebonized (wood that has been dyed to look black) woods are an absolute pain to work with so I figured I'd write about my discoveries.

Real ebony fretboard from a 1968 Hagstrom Viking II

Real Rosewood fretboard from a 1990s Yamaha Acoustic


Ebonized fretboard from a 1950s Harmony "Roy Smeck"
Ebonized and lacquered fretboard from a 1954 Silvertone

Ebonized fretboard from a generic fiddle
The black patches are whats left of the dye

 The How

This is going to be incredibly simplified as I'm piecing together what I'm reading and haven't actually tried this myself, I'll include sources. The process of Ebonizing wood involves soaking the lighter-colored wood with ferrous acetate, a chemical which you can make by soaking fine steel wool in a solution of vinegar. The ferrous acetate reacts with the tannins in wood and as a result turns the wood dark.

https://www.woodtalkonline.com/topic/20527-force-aging-wood/

Alternatively
M. Konick, in the British Journal of Photography, suggests the following method of blackening wood, which has the advantage of resisting acids and alkalies:
A
Cuprice cloride, 75 parts
Sodium chlorate, 67 parts
Water, 1000 parts
B
Aniline hydrochlorate, 150 parts
Water, 1000 parts
Paint the wood with A and a short time after with B, and remove with a damp cloth the yellow powder that forms. Repeat this operation every day till the desired color is obtained, and then rub the wood with vaselin or linseed oil. By using potassium bichromate instead of the soda salt, a good black color is obtained at once.
http://www.mugwumps.com/blacken.html 

The Why

Dyed domestic woods were not uncommon during the mid century, they were a cost effective replacement to more expensive "genuine" woods. "Pearwood" is a term used often to refer to the fingerboards made of the wood from fruit trees which was common in Europe. In the US, though, you see a lot of birch, sycamore, and other cheaper woods. I've heard faint mentions of maple fretboards that were dyed though I can only imagine they react the same way due, again, to the dying process. 

Most student model Kay and Harmony guitars from the 50s and 60s are built with these dyed fretboards to keep costs low. More expensive models and some earlier student models will have fretboards made of a solid hardwood. For example, my Kay-built Custom Kraft archtop from the 1940s has a Brazilian Rosewood fretboard but my Kay N-3 archtop from the 1960s has a domestic wood fretboard that has been dyed an almost reddish tint. I don't have a terribly large sample size to choose from but I do wonder about the scope of dyed fretboards

Painted fretboards were also commonly used and in my experience those have held up better structurally. That process is more simple and involves taking a hardwood (again usually light-colored) and painting it black then fretting the guitar. Typically these guitars don't wear through the paint unless they were loved and played regularly, but even then the wood is generally in better condition and easier to be patched. 

My Experience

The dye unfortunately has the effect of rotting the wood and making it extremely brittle and prone to chipping. So when working on these fretboards they will tend to fracture very easily even after intensely working to moisturize the wood (though it does help a little) and will likely already have cracks in them. I've found that taking out the 13th fret (on 12 frets to the body guitars) will lead to a lot of chipping and frustrating moments trying to repair the breaks.

The trick of using a like-wood dust and water-thin super glue to patch the fretboard does not work well with ebonized wood as the colors will never truly match and sanding the patch level does more damage to the soft, original wood. The Harmony Roy Smeck flat top acoustic, pictured above, was one guitar where I used real ebony dust and super glue to try and make the cracks invisible. I figured it would work since ebony is very tight grained and in my experience patching cracks in ebony comes with great results. I did not find such results as the original fingerboard chipped away as I was sanding my super glue patch and eventually I have to leave the guitar at "good enough" because I was afraid I'd do more damage. 

In the future I'll probably try to stray away from these fretboards and if a guitar has one that I am really fond of, I might pull it off and replace it with an actual hardwood that matches the color. Also Stewmac and LMII sell fingerboard dyes that I believe have a less harsh formula which will increase the lifespan of the wood but of course that all depends on what wood you use underneath it.

Conclusion

Ebony and rosewood are still valuable woods today and with environmental protections and trade bans to stop the species' from becoming extinct, they will likely rise in price. But there is a growing market for alternative woods like Pau Ferro; which Fender has substituted in for rosewood in their Mexican line of guitars. 

I wouldn't doubt that dyed fretboards are still used but personally I have not encountered them in any recently made guitars. I've run across articles where people dye their rosewood board to look like ebony but that isn't quite the same as ebonizing a much cheaper wood.

Further questions

I've stumbled across a fair amount of student guitars from the 70s until present day and I have yet to encounter another dyed fingerboard. This is all anecdotal but I haven't found them commonly used past the 1960s and I've seen them used even less in the Japanese import guitars. 

So why? Maybe the practice fell out of fashion? Maybe the wood industry changed? Maybe costs in Asia allowed for more expensive woods than the USA? 


No comments:

Vintage Pickguard Traces and Templates This is my collection of traced pickguards from the vintage instruments that I have worked on....

Vintage Pickguard Traces


1940s Custom Kraft Pickguard picture1940s Custom Kraft Pickguard tracing

Vintage Pickguard Traces and Templates

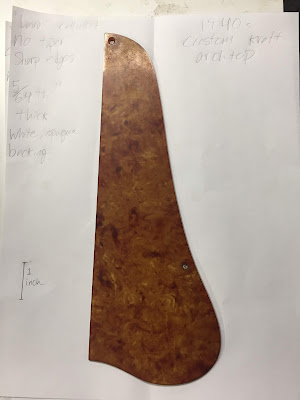
This is my collection of traced pickguards from the vintage instruments that I have worked on. I've traced them to provide documentation and reference material for individuals looking to make replicas and am providing them for free on my website. These tracings are done on standard 7.5"x11" printer paper with a #2 pencil and are scanned onto my computer. You should be able to print them out and use the 1 inch size reference to verify the accuracy of your sizes.

If you are interested in using these tracings to produce and sell replica pickguards, please be courteous and contact me first. Otherwise these are only for personal and not commercial use.

1965 Burns Vibraslim Bass


This pickguard is from a British-made Burns/Baldwin Vibraslim Bass guitar. It is 3/32" thick in total but the pickguard is mostly white with a 1/64th" thick black veneer on top. The words "Baldwin" are engraved in the pickguard

1940s Custom Kraft (Kay-built) Blonde Archtop


This pickguard is made out of a celluloid material that is red and orange and resembles lava from a volcano. It has two counter-sunk screw holes to mount into the body and it rests on two orange rubber washers and a white, paper backing to make the pickguard opaque. It is 5/64ths of an inch thick and does not have any taper or smoothing on the edges. It is mounted with two screws and placed on top of two, "pencil eraser"-color, rubber washers

1940s Custom Kraft (Kay-built) Natural Archtop


The pickguard is a translucent orange celluloid with green-black splotches added for a tortoise appearance. It has an 8th note engraving with white paint and faux gemstones inlaid into it. The pickguard is 1/16" thick and has a soft bevel all the way around.

1940s Kamico (Kay Musical Instrument Company) Parlor Flattop


This pickguard is a parchment color (possibly white but faded) with sharp, 90 degree edges all around. It is 1/16th" thick and mounted with two screws directly to the body

Late 1960s Kay Country Flat Top


The pickguard is 1/16" thick tortoise celluloid that is not bevelled around the edges. It also has an embossed Kay logo in a circle. 

1950s Kay K150 Archtop


The pickguard is 1/16" thick cream celluloid with a 1/16" thick tortoise celluloid control plate with a paper backing. The pickup ring is made from Brazilian Rosewood.

1960s Kay K5160 Auditorium Flat Top


Note the strange logo on the pickguard, that is because this guitar was branded TrueTone for Western Auto.

It is 1/16" thick cream celluloid without a bevel on the edges. 

1960 Kay K60 Jumbo Archtop


1960 Kay K6970 Swingmaster Semi Hollow

The pickguard is made from a plastic that has yellowed with age and is mounted with two screws directly to the guitar. The guard is 3/32nd of an inch thick with a bevel on all edges except the left side (facing the pickups) which is sharp 90 degrees. 

1945 Harmony 'War Time' Archtop


The pickguard is tortoise celluloid over a thin, white backing plastic. It was terribly corroded when I found it due to the pickguard gassing off but I was able to trace it and get dimensions. Also documented is the Brazilian Rosewood bridge which is bolted to the top of the guitar. These were only used during the early 40s due to metal rationing

1954 Silvertone Flattop Acoustic

1954 Silvertone Pickguard picture
1954 Silvertone Pickguard tracing
This pickguard is also make of a "lava celluloid" and is translucent without a backing. It also has no taper but the edges are rounded about a 1/3rd of the way down the height of the pickguard. This pickguard is also 5/64ths of an inch thick and has three counter-sunk screw holes that mount directly into the body. 

1970 Buck Owens Americana (Harmony)

The revered, and quite pricy, Harmony Buck Owens Americana model in their wild red, white, and blue finish. I traced the bridge, pickguard, and truss rod cover. The pickguard has shrunk slightly but that is the shape and general size. You can always blow the picture up a hair to cover the mismatched UV fade.

2 comments:

https://reverb.com/item/13211704-vintage-japanese-built-american-jewel-electric-guitar-in-cherry-burst

MIJ American Jewel Guitar


1 comment:

The Drome Racing Challenge is a different kind of multiplayer game, designed for LEGO.com. As a driver in the Drome, you collect and mod...

Lego Drome Racing Challenge

Drome Racing Challenge logo from the lego website
The Drome Racing Challenge is a different kind of multiplayer game, designed for LEGO.com. As a driver in the Drome, you collect and modify a set of custom racing cars, strategically preparing them to race. When you're ready to hit the tracks, your car faces off against another player's vehicle in an action-packed, anime-style cartoon that is different every time you play.
Get in on the high-speed excitement for free exclusively at lego.com. 

Side-by-side screenshot of the game with caption "Charger activate!"
Opening screen for a match between RED team and Nitro team

Source: Wayback Machine - Gamelab's Website


Login Page

Are you ready for the drive of your life? When you become a Drome Racer, you'll get to join a racing team, customize your cars, and race them against other players. If high speed and extreme danger are too much for you, play it safe and steer clear. Otherwise, see you in the Drome.
Source: Wayback Machine - DRC Login Page

And what's this Drome Racing thing all about?

The Drome Racing Challenge is a different kind of
multiplayer game, designed for LEGO.com. As a
driver in the Drome, you collect and modify a set
of custom racing cars, strategically preparing
them to race. When you're ready to hit the tracks,
your car faces off against another player's
vehicle in an action-packed, anime-style cartoon
that is different every time you play.

Are you ready for the high-speed excitement of the
Drome Racing Challenge? Head to
http://www.lego.com/racers/challenge to take part in
the action!
Source: Wayback Machine - 2002 Gamelab Press Release

The Lego Drome Racing Challenge was Macromedia Flash game developed by independent game studio Gamelab for Lego.com and released in March of 2002. It lasted until April of 2017 when a game-breaking bug caused Lego to delete the game entirely [1]. Not to be confused with Lego Drome Racers which was a console game from the same era but wildly different than the web version. Gamelab also developed Lego games such as Junkbot, Worldbuilder, Spybotics, and others which were on the website at the time. Gamelab went defunct in 2009 and its assets were acquired by Arkadium which specializes in interactive website content [3].

Closure

For five years the Drome Racing Challenge has run its course - and we know how many people enjoyed playing it! Lately, however, there has been an alarming amount of hacking incidents which spoils the fun for all who play fair.So, the time has come to retire the Drome Racing Challenge and focus on creating a new gaming experience for you Racing fans. Thank you for playing over the years!
Source: Wayback Machine - Lego.com Game Closure

Brickwiki

BrickWiki.info was the best resource for information about DRC including team names, tracks, and some unsourced commentary about rivalries but unfortunately as of November 2019 it appears to be offline. You can access a Wayback Machine archived version of it here 

Lego Message Board


The forum as it appeared on October 10th, 2008 [2]
Most interpersonal communication about the teams and the game took placed in the Lego Message Board. Teams communicated in mega threads.

July 2018 Email to the Developers at GameLab

I managed to track down the people who built the game for Lego and contacted some of the old members of it.

Nat,
Thanks for your email to Frank. He forwarded it to me and I'll try and answer your questions. I was one of the founders of Gamelab and worked on most of our LEGO games.


1. Do you have a copy of the code anywhere or a compiled version? I would love to skim through it even if it doesn't hardly work at all. Even some of the assets would be an incredibly nostalgia trip for me
4. Does Arkadium own the rights to all your guys' games after GameLab went defunct?
We don't unfortunately have copies of the code we can distribute. In the case of games like our LEGO games, LEGO still owns the rights to the games. Arkadium only owns our old website domain, but nothing else.
2. How did it get started? Did Lego contact you guys with an idea or did you guys pitch it to them?
3. What caused the game to shut down?
In the case of Drome Racing Challenge, they brought us the basic idea of a multiplayer online racing game and we shaped it into the final game. I'm not sure why LEGO decided to take the game down but they tended to cycle out games that no longer were attached to their current products. So after they discontinued the toys connected to DRC, they eventually closed down the game.

Glad you enjoyed the game and hope this helps!
-eric 

Sources


12 comments:

The worst guitar I have seen to date I am confident that this guitar was left in the heat somewhere, whether in a vehicle or a hou...

Early 1950s Silvertone Flat Top Restoration

The worst guitar I have seen to date


I am confident that this guitar was left in the heat somewhere, whether in a vehicle or a house, and has since warped itself apart. I have never encountered soundhole warping to the degree that this guitar has nor do I think it could have occurred naturally form string tension. I don't have a lot of money into this guitar so I can try techniques that I have never attempted before.


Wooden nut, Art Deco-styled logo

Diving In

First thing I noticed is that the back was separating from the rest of the guitar and so that made attempting to take it off quite easy. I followed the advice I saw on Stewmac and built a cardboard support to help the body hold its shape while the back was off.

The second thing I noticed was the faint smell I encountered previously had developed into a full blown stench in the presence of heat and water. This guitar smells nasty. Its hard to explain but I had to work on it outside for fresh air and the reddish glue I think is the cause of the odor. I'm working on it in pieces and in the mean time the rest of the guitar is sitting in an isolated closet with a dish of baking soda in hopes of removing the scent. I tried Febreeze (the cornstarch-based mixture, not the aerosol) and Pet Urine Remover (my first thought) but it still lingers behind.

 The back came off quite easily, I used a putty knife that I kept in a container of very hot water to slide around the edges and pry it off. Luckily this guitar is only bound on the top so I did not have to mess with any binding and the paint is so damaged from the heat that I doubt anyone will notice that the back came off.

It was super fascinating to dive into this guitar as you see pencil marks and stamps and other clues left behind by the craftsmen who built this guitar so long ago. The history behind these instruments is one of my favorite parts of working on old guitars. I initially figured that these guitars were plywood but they are indeed solid wood, not sure what kind but the top, back, and sides are made of the same wood and it isn't spruce.
The guitar's back has two almost-parallel warped spots that go length-wide near where the neck meets the body. Those braces are holding on by a prayer a la Bon Jovi

The piece of tape in the upper right is holding on a cleat
I used an acid brush (disposable and cheap) dipped in my container of hot water to loosen the glue and then my putty knife and chisel to clean up the areas. I decided to brush the water around the corners of all the braces to soften the old hide glue and then I painted on some new, fresh fish glue to really help cement the braces in place. 

I quickly realized that I don't have enough deep clamps to tackle all of clamping that needed to get done so I'll probably do it in segments next time but this works for now. The upper-most brace needed to come off entirely and then I wet the wood with hot water and let it sit between two blocks of wood before attempting to force it around the brace again. I've never messed with the tops or backs of guitars like this before so I know there should be a slight radius (flat top is a bit of a misnomer) and I'm hoping the braces will force that radius back into the body.

Regluing the back

As of 6/24 I have the back reglued and just pulled the neck off in order to do a neck reset. Regluing the back onto a guitar is trickier than I thought since the sides of the guitar often want to "dive" or "lean" certain directions which differ from where they were when the guitar was first built.. I also should have invested in spool clamps or at least more clamps to make sure the body was adhered evenly. I'll get back to fixing that soon enough.

The neck came off fairly easily and I got to work on resetting the neck. In the process I managed to break off the fretboard extension which leads me to continue to curse "fruit wood" and "ebonized" fretboards as they are extremely delicate and difficult to keep from fracturing. I'll put it back together and it should be fine.

Dating

My serial number info I obtained from the Harmony Guitars Database FAQ which is a great resource for information about these guitars. 

The art deco logo would put this guitar around the 1940s and early 50s but I wanted to know for sure so I went through and wrote down the contents of all the stamps within the guitar. I did not get pictures of them and unfortunately the process of steaming the guitar back together has mostly destroyed the ink and therefore the stamps.

The guitar was stamped, approximately as the ink was already faded, 8869H614 on the top just above the first brace. On the back it was stamped F-54 as well as some unreadable characters and then below it I could just barely make out "Made in U.S.A" and that was entirely enclosed in a box the same color as the text. 

Recreation of the date label stamped on the back of the guitar
 H614 should be the model number of the guitar built by Harmony but information is sparse and so I can only assume there is a similar model under the Harmony name out there. 8869 is apparently a mostly meaningless number, likely referring to each specific guitar within a batch but I have no proof of it. 

F-54 means that this guitar was built in 1954 and the F either stands for "Fall" or "First half of the year" depending on who you ask. The one constant is that this guitar is from the 1950s like I previously suspected. 


No comments:

Look at that heavily lacquered fingerboard First Update Crack repair  Fingerboard De-lacquering   The fingerboard was co...

Hijos De Vicente Tatay Classical Restoration


Look at that heavily lacquered fingerboard

First Update


Crack repair

 Fingerboard De-lacquering


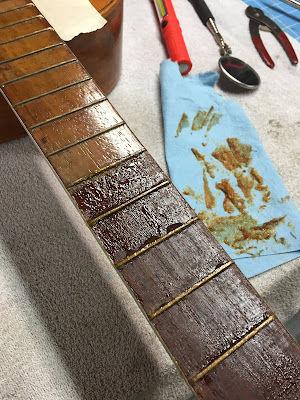
The fingerboard was coated (over the frets and all) with shellac and it had browned and turned almost butterscotch colored over time which I thought looked really bad and gross. So I taped off the proper edges and took some aircraft paint stripper and went to town on the board with painting the gel, waiting while it bubbles up, and scraping it off with a putty knife.

Eventually I got it almost entirely off and put some oil in the fretboard since its the first time its seen oxygen since it was built.
Beautiful mystery wood and large brass frets
Afterwards I realized that my scraping had left scratches in the fingerboard so I carefully removed all the frets, discovered how soft brass actually is, and sanded the fretboard to remove most of the big scratches. Then I put the frets back into the board and gave the whole thing a good cleaning. Now it looks fantastic and I'm continuing to dive into the restoration.

One piece of kerfling had been broken off from the damage to the top, I have the piece but need to reglue it
Aforementioned damage

The guitar before I took the fretboard off

The neck angle on the guitar in its current state is not optimal for playing, if you put a straight edge on the neck, it runs itself down into the lower middle half of the bridge. Unfortunately this guitar was built with a Spanish heel which means instead of the neck being attached to the body via a dovetail joint, the neck is a whole block inside the body and cannot be removed without taking the guitar apart.

I am not willing to do that to this instrument so I took the fretboard off of the guitar, cleaned up some of my damage, and am currently waiting on a long, thin wedge that will go under the fingerboard and lift it up to a better angle for playing.

I discovered that this guitar is finished using a technique called French Polishing which involves wiping shellac on in some manner which I am not familiar with. The end result appears to be a more soft finish that doesn't crack and splinter as easily as a regular lacquer finish. That I think will be beneficial in masking my repairs

The Ramp

This is my drawing that I sketched up to indicate how I planned on building the wedge that would push the fingerboard up to the correct angle in order to have good action through the strings. I've contacted a couple businesses now and am currently waiting for the weekend to pass so I can get a response.

The plan is to glue this wedge to the neck, after I straighten it and put a carbon fiber rod in it, and then glue the fingerboard to the wedge and then I should hopefully have a perfectly playable classical. One of my concerns was that the ramp would cause the guitar to be too thick near the body but luckily that area only is around 1/8th of an inch taller than the neck at the nut so it shouldn't be too bad.

No comments: